How to Setup OpenVPN using Ubuntu Network Manager
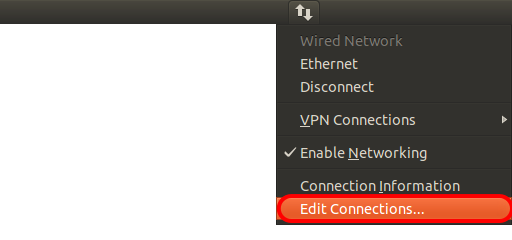
Click the network manager icon in the top menu bar and select "Edit Connections..."
 In the Network Connections box click "add".
 On the dropdown menu click "Import a saved VPN Configuration" and click create...


Next, we need to select one of the openVPN configs (which you already have for example vpnbook.com)for the server you'd like to connect to.
In our example, we are connecting to IP.ovpn

If you get error like The file 'edunet.ovpn' could not be read or does not contain recognized VPN connection information
Error: unknown PPTP file extension.
1) Execute the following commands in your Ubuntu terminal:
sudo apt-get install openvpn network-manager-openvpn network-manager-openvpn-gnome

sudo apt-get install network-manager-vpnc

sudo /etc/init.d/networking restart
the VPN login info that you chosen on signup or you know. For CA certificate open the vpn config that you are importing in text editor and scroll down you will find ca certificate cut that and save it in new texteditor with the name ca.cer then Click Save.

The VPN connection has now been added to your Network Manager Connections list!
You can now click the network manager icon in the top menu bar, Select "VPN Connections"
Then click the name of the TorGuard VPN server you want to connect to and you should get this after a succesful connection:


Comments
Post a Comment