Is your ISP using a transparent proxy? DETECT,EXPOSE & EXPLAIN
A transparent proxy is a middle man system used by your ISP that unknowingly to you redirects all your traffic on it’s way to the Internet and back. During this redirection process, all your HTTP traffic can and probably is logged, read and analysed. I strongly believe that your Internet traffic information is yours to own. That is why it is important to read this article in order to understand how to transparent proxies work, their dangers, how to detectthem and how to protect yourself. https://thevpn.guru/wp-content/uploads/2014/03/Transparent-Proxy-Ini

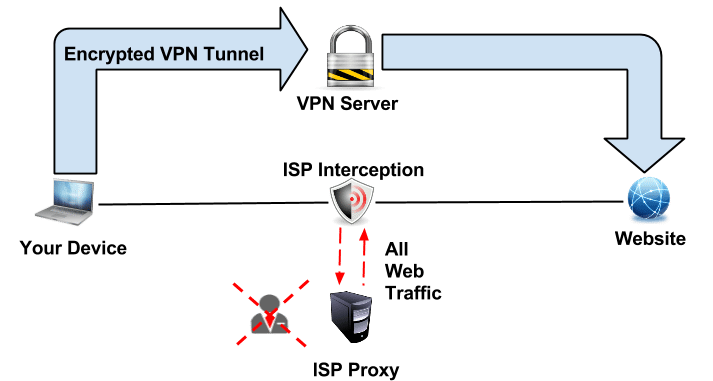


Please refer to the illustration above, as you can see you are sending your HTTP web traffic to any given website, your traffic is intercepted by your ISP “a.k.a Internet Provider” and redirected to an ISP server which runs a proxy “a.k.a middle man” this ISP Proxy can and probably does log all your traffic, what you visited, when you did visit and so on. More importantly, all of your unencrypted clear text traffic can easily be read by anyone who has access to that server, that includes passwords,emails, private messages and so on. Essentially, your ISP is pulling an MITM “Man In The Middle” attack on you using the ISP Proxy .It is probably bad enough that governments do this, but having an ISP employee looking at your traffic in a rather un-monitored environment is a different story.
This is more common in EU, US and CA than you might think, I do interact with hundreds of users a week and I know for a fact that a lot of users in the mentioned regions are victims ofTransparent proxies and DNS Hijacking.
Why do they use transparent proxies?
- They can cache incoming web data, This is one of the benefits of a proxy cache. This allows your ISP to save a huge amount of bandwidth while serving the requested cached data much faster.
- They can force users to use your proxy, allowing password checking,web filtering, and other functions. - Yes, they can see what you are doing and act upon it, for example they can limit your download speed if their proxy server sees that you are downloading an mp3 file.
- On the fly image optimization - Ive seen this on some ISPs where they automatically compress the requested images to save bandwidth. This is good for mobile users since you will only download less data but there are instances where the image is totally compressed to the point that you really can not see the image anymore.
- They can allocate your traffic to go out other gateways aside from your default, without needing to use load-balancing software or BGP.
- Bandwidth throttling and tethering detection - They can also use this to throttle your internet connection and detect if you are tethering your mobile internet connection.
TRANSPARENT PROXY – HOW TO DETECT
Depending on your ISP’s configuration of the transparent proxy it might be anywhere from easy to close to impossible to detect a transparent proxy. If the tests below show you do not have a transparent proxy, you might still be behind one. If you are on the paranoid side, see the protection mechanisms in the next section.
- Visit www.whatismyproxy.com if it says you are behind a proxy or you are probably behind a proxy, then you are behind one.
- If www.whatismyproxy.com does say “No Proxies Detected” go to www.whatismyip.com. If the two IPs reported by these two sites differ, you are certainly behind a transparent proxy.
- There are more advanced ways that would require above average technical expertise and access to tools that can give a more confirmed result. However, keep in mind that the first two steps above are not 100% accurate.
- One more way to detect you are behind a transparent proxy follows : If you try to use a Smart DNS Proxy such as Unlocator to unblock Netflix, Hulu, Amazon Instant Player or BBC IPlayer from within or outside the USA, it probably wont work. The reason being that a transparent proxy breaks the Smart DNS logic.
TRANSPARENT PROXY – PROTECT YOUR PRIVACY
How to find transparent proxy servers of your ISP?
Steps:
- Download “Tracetcp” from http://tracetcp.sourceforge.net/.
- Copy tracetcp.exe to your documents folder (or any other location).
- From run type ‘cmd’ and open Command promp.
- Go to the location where you copied tracetcp. (using cd command).
- To get to know which commands are to be used, press “tracetcp -?” (without thequotes)
Type tracetcp google.com:80 or tracetcp www.google.com
Now, we use the tcptrace command, which is downloaded previously.
Here we specify the domain name along with its port number. First we’ll see what happens whe we trace port 80 (http port).
Here the trace continues normally till my first gateway (ISP). Then we see appearances of 3 private IPs with 10.X.X.X. These are nothing but the ISP proxy servers running in transparent mode meaning that no end user configuration is required. When an user browse an webpage, this request is first passed to this server and then after checking its presence in the cache (checking whether it’s a cache hit or a miss), it redirects the request to ISP gateway connected to the ISP’s transit provider (in this case Tata Communications).
Thus among these three IPs, the first and third one probably is a gateway, the second one is a cache server.
The best way to protect your traffic from interception, tampering and spying is by using a VPN. A VPN or Virtual Private Network creates an encrypted virtual tunnel between yourself and the VPN server, this encrypted tunnel is like a stealth shield for your traffic. A VPN will protect your traffic and thus your privacy. As result the ISP can not intercept or decrypt your traffic and your traffic will NOT go through the ISP Transparent Proxy. Please have a look at the illustration above, once you have a VPN tunnel setup your traffic goes encrypted to the VPN server, and from there on it goes like normal to the website, the ISP can see that you are generating traffic but it does not know what it is, or what the final destination is. The best part is yet to come, all you need is a VPN subscription and a few minutes of your time and you can have VPN running on all supported devices you own “PC, Ipad, Ipod, Iphone, Android, Supported routers and many more“. I personally use a VPN service called vpngate.net.
DNS Cryptography to stop ISP Espionage and Transparent Proxies
you will be surprise to know that your Dns is also going through ISP dns as they have seted a transparent Dns
DNS Cryptography to stop ISP Espionage and Transparent Proxies
DNS Cryptography to stop ISP Espionage and Transparent Proxies
Hello, today i will be showing you how to properly setup a DNSCrypt to prevent monitoring, logging on your DNS by your default provider, we will do this by changing our DNS provider to an off-shore DNS service that does NOT log our requests , and encrypting DNS queries and responses. before we understand how this works , we have to understand a bit about DNS and what it is.
DNS:
Short for Domain Name System or Domain Name Service, a DNS is an Internet or network server that helps to point domain names or hostnames to their associated Internet Protocol address. It was introduced by Paul Mockapetris and Jon Postel in 1983. Without a server to resolve a domain name or the proper rights, users would have to know the IP address of each of the web pages or computers you wanted to access.
Now that we have that basic knowledge of DNS , we will look into: Transparent DNS proxies and how Internet Service Providers use them to monitor and spy on users.
Some ISP’s (Internet Service Providers) are now using a technology called ‘Transparent DNS proxy’. Using this technology, they will intercept all DNS lookup requests (TCP/UDP port 53) and transparently proxy the results. This effectively forces you to use their DNS service for all DNS lookups.
If you have changed your DNS settings to use an ‘open’ DNS service such as Google, Comodo or OpenDNS, expecting that your DNS traffic is no longer being sent to your ISP’s DNS server, you may be surprised to find out that they are using transparent DNS proxying.
When using an anonymity or privacy service, it is extremely important that all traffic originating from your computer is routed through the anonymity network. If any traffic leaks outside of the secure connection to the network, any adversary monitoring your traffic will be able to log your activity.
Remember DNS or the domain name system is used to translate domain names such as www.privacyinternational.org into numerical IP addresses e.g. 123.123.123.123 which are required to route packets of data on the Internet. Whenever your computer needs to contact a server on the Internet, such as when you enter a URL into your browser, your computer contacts a DNS server and requests the IP address. Most Internet service providers assign their customers a DNS server which they control and use for logging and recording your Internet activities.
Under certain conditions, even when connected to the anonymity network, the operating system will continue to use its default DNS servers instead of the anonymous DNS servers assigned to your computer by the anonymity network. DNS leaks are a major privacy threat since the anonymity network may be providing a false sense of security while private data is leaking.
Now that we understand why ensuring security on our DNS is so important, we will use a script to activate DNSCRYPT on our DNS , the script will also allow us to change DNS providers.
Remember DNSCrypt is a protocol for securing communications between a client and a DNS resolver by encrypting DNS queries and responses. It verifies that responses you get from a DNS provider have actually been sent by that provider, and haven’t been tampered with.
Some of the supported providers are :
Europe
|
No logs, DNSSEC
| |
Anycast
| ||
Australia
|
No logs, DNSSEC
| |
Japan
|
No logs
| |
Europe
|
No logs
| |
Europe
|
No logs, DNSSEC
To get started we first have to open a Terminal, we can do this by pressing CTR+ALT + T or finding it in the accessories section of your system.
We will first download the script from it’s official Github by running the following
Once the script has downloaded into the directory you are in , we want to change it’s permission so that we are able to run it. To do this, we run the following
chmod +x dnscrypt-autoinstall.sh
When the permissions have been changed,we will run the installer script by inputting the following:
./dnscrypt-autoinstall.sh
Once you start the process it will ask you:
“Would you like to see a list of supported providers? (DNSCrypt.eu is default) [y/n]: n”
hit y and enter.
you should now see a list of DNS providers:
“Which DNSCrypt service would you like to use?
1) Off (Regular, unencrypted DNS)
2) DNSCrypt.eu (Europe – no logs, DNSSEC)
3) Cisco OpenDNS (Anycast)
4) CloudNS (Australia – no logs, DNSSEC)
5) OpenNIC (Japan – no logs)
6) OpenNIC (Europe – no logs, whitelisted users only)
7) OpenNIC (Toronto, Canada – no logs)
8) OpenNIC (San Francisco, USA – no logs)
9) OpenNIC (Seattle, USA – no logs)
10) OkTurtles (Georgia, USA – no logs)
11) Soltysiak.com (Europe – no logs, DNSSEC)
Select an option [1-11]:
“
In this case we will change to the DNSCrypt provider, which sits in Europe and does not log requests, to do this we type 2 and hit enter.
Your system will update and the installation and provider change will start as well as the key authentication , this process will take around 10 to 15 minutes depending on your connection at the time, if all goes well, the desired output should be:
“DNSCrypt is now installed.
You can run this script again to reconfigure, turn off, or uninstall it”
Finally to test our changes, a great service is
If everything went to plan , your test results should be something like :
|
Thanks for this post, I really appriciate. I have read posts, all are in working condition. and I really like your writing style. Keep it up like.
ReplyDeletetray free proxy liveproxydaily.blogspot.com
This is a great article thanks for this informative information. I will visit your blog regularly for some latest post. I will visit your blog regularly for Some latest post.
ReplyDeleteinternet Service provider
Your article has piqued a lot of positive interest. I can see why since you have done such a good job of making it interesting. 1337x
ReplyDelete